Difference between revisions of "Photo Intermediate Camera Kits D40 Kit"
(→What's in the kit?) |
|||
| (36 intermediate revisions by 5 users not shown) | |||
| Line 3: | Line 3: | ||
[[Category:Equipment Tutorial]] | [[Category:Equipment Tutorial]] | ||
| − | + | The Nikon D40 is a 6.1 megapixel, entry-level [http://en.wikipedia.org/wiki/Digital_single-lens_reflex_camera digital SLR camera] with an APS-C equivalent Nikon DX sensor. | |
| − | |||
| − | + | It does not have a built-in auto focus motor, which means that only F-Mount lenses with internal focus motors such as AF-I and AF-S models, can be used in auto-focus mode. | |
| − | ''' | + | '''this kit also comes with the cord for USB connections and to charge the battery. please do not lose these cords''' |
| − | |||
| − | ''' | ||
| − | |||
| − | == | + | This camera is available to students with [[Equipment_Cave_Tutorials#Photo_Intermediate_Clearance | Photo Intermediate clearance]]. |
| + | |||
| + | ==What's in the kit?== | ||
| + | |||
| + | {| border="1" cellpadding="2" style="text-align:center;" | ||
| + | |- | ||
| + | |width="150pt"|'''Nikon D40''' | ||
| + | |width="150pt"|[[Image:NikonD40 sm.png ]] | ||
| + | |width="150pt"|[[File:D40Lens.jpg|frameless|150px]] | ||
| + | |width="150pt"|[[Image:Uv protector.JPG|frameless|150px]] | ||
| + | |width="150pt"|[[Image:Nikon QCharge sm.png]] | ||
| + | |width="150pt"|[[Image:TargusSoftBag sm.png]] | ||
| + | |- | ||
| + | ||| Nikon D40 || D40 Lens || TiffenUV Protection Filter || Nikon MH-23 Charger || Soft Camera Bag | ||
| + | |} | ||
| + | |||
| + | ==Auto Mode== | ||
| + | |||
| + | [[Image:D40auto.png|frame|Top view of the power switch and mode dial ]] | ||
| + | |||
| + | Auto Mode is more commonly known as "Point and Shoot", this allows the user to take a picture more easily by letting the camera decide what settings to choose based on environmental conditions. | ||
| + | |||
| + | ===Step One=== | ||
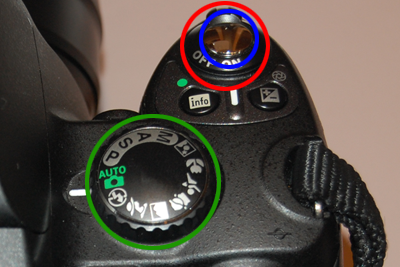
| + | The first step would be to turn the camera on. Looking to the right flip the POWER SWITCH which is circled in red. Once the camera is in and the display monitor turns on you may remove the lens cap. | ||
| + | |||
| + | ===Step Two=== | ||
| + | To the right the mode dial is circled in green. Rotate the MODE DIAL to the AUTO MODE selection. | ||
| + | |||
| + | ===Step Three=== | ||
| + | Once the camera is on you are now able to take a picture. Circled in blue is known as the SHUTTER RELEASE button. While you're looking through the viewfinder, pressing the SHUTTER RELEASE will allow the camera to AUTO FOCUS. Once the image is in focus the camera will beep and you can press the SHUTTER RELEASE down. The camera will then take a picture. | ||
| + | |||
| + | ===Step Four=== | ||
| + | When the camera is not is use it is always proper to turn the camera off. All you have to do is rotate the POWER SWITCH back to the off position | ||
| − | |||
| − | |||
<br style="clear:both" /> | <br style="clear:both" /> | ||
==Memory Card Slot== | ==Memory Card Slot== | ||
[[Image:D40MEMCARD.png|frame|Open memory card slot ]] | [[Image:D40MEMCARD.png|frame|Open memory card slot ]] | ||
| − | + | The Nikon D40 digital camera uses SD memory cards to store photos on. To your right is a view of the MEMORY CARD SLOT. To open it slide the cover toward you, the cover should pop open. | |
<br style="clear:both" /> | <br style="clear:both" /> | ||
==Recharging the Battery== | ==Recharging the Battery== | ||
| − | [[Image:D40BATTERY.png|frame | + | ===Battery Cover=== |
| − | + | [[Image:D40BATTERY.png|frame|Battery pack taken out of the camera ]] | |
| + | '''Step 1'''<br/> | ||
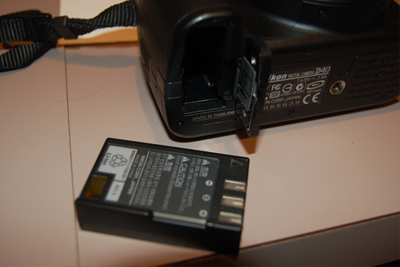
View of the BATTERY COVER. To open slide the switch toward the body of the camera and it will pop open. Slide the battery out. To recharge the battery remove it from the camera itself. | View of the BATTERY COVER. To open slide the switch toward the body of the camera and it will pop open. Slide the battery out. To recharge the battery remove it from the camera itself. | ||
| − | <br><br | + | <br style="clear:both" /> |
| + | |||
| + | ===Recharging the battery=== | ||
| + | [[Image: D40CHARGER.png|frame|Recharging the battery pack ]] | ||
| + | '''Step 2'''<br/> | ||
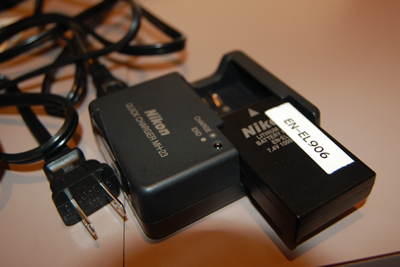
Connect the power cord to the charger and plug it in. Place the battery in the charger and slide it forward until it locks. The CHARGE LAMP will begin to blink. When the battery is fully charged the CHARGE LAMP will go solid. A full charge takes roughly 90 minutes. | Connect the power cord to the charger and plug it in. Place the battery in the charger and slide it forward until it locks. The CHARGE LAMP will begin to blink. When the battery is fully charged the CHARGE LAMP will go solid. A full charge takes roughly 90 minutes. | ||
| − | <br><br><br><br> | + | <br style="clear:both" /> |
| + | |||
| + | ==Reviewing Pictures== | ||
| + | [[Image:D40REVIEW.png|frame|Reviewing pictures using the LCD screen ]] | ||
| + | To review a picture click the PLAYBACK BUTTON which is circled in red to the left. To cycle between pictures click right or left using the MULTI SELECTOR which is circled in green to the left | ||
| + | <br style="clear:both" /> | ||
| + | |||
| + | ==Lens Cap== | ||
| + | [[Image:D40LENS.png|frame|Attaching the lens cap ]] | ||
| + | To protect the camera’s lens, please put the LENS CAP back on the camera when not in use. Just squeeze the clips toward each other and place back over the lens. Make sure it locks properly. | ||
| + | |||
| + | <br style="clear:both" /> | ||
| + | |||
| + | ==Full Manual== | ||
| + | This tutorial went over basic operation of using AUTO MODE of the Nikon D40 Digital Camera. If you are interested in learning more on the advanced features please refer to the owners manual located on the Nikon website.<br> | ||
| + | http://www.nikonusa.com/pdf/manuals/noprint/D40_noprint.pdf | ||
| + | |||
| + | ==External links== | ||
| + | * [http://imaging.nikon.com/products/imaging/lineup/digitalcamera/slr/d40/index.htm Nikon D40 - Nikon global website] | ||
| + | * [http://www.nikonusa.com/Find-Your-Nikon/Product/Digital-SLR/25420/D40.html Nikon D40 - Nikon USA website] | ||
Latest revision as of 23:56, 21 August 2012
The Nikon D40 is a 6.1 megapixel, entry-level digital SLR camera with an APS-C equivalent Nikon DX sensor.
It does not have a built-in auto focus motor, which means that only F-Mount lenses with internal focus motors such as AF-I and AF-S models, can be used in auto-focus mode.
this kit also comes with the cord for USB connections and to charge the battery. please do not lose these cords
This camera is available to students with Photo Intermediate clearance.
Contents
What's in the kit?
| Nikon D40 | 
|

|

|

|

|
| Nikon D40 | D40 Lens | TiffenUV Protection Filter | Nikon MH-23 Charger | Soft Camera Bag |
Auto Mode
Auto Mode is more commonly known as "Point and Shoot", this allows the user to take a picture more easily by letting the camera decide what settings to choose based on environmental conditions.
Step One
The first step would be to turn the camera on. Looking to the right flip the POWER SWITCH which is circled in red. Once the camera is in and the display monitor turns on you may remove the lens cap.
Step Two
To the right the mode dial is circled in green. Rotate the MODE DIAL to the AUTO MODE selection.
Step Three
Once the camera is on you are now able to take a picture. Circled in blue is known as the SHUTTER RELEASE button. While you're looking through the viewfinder, pressing the SHUTTER RELEASE will allow the camera to AUTO FOCUS. Once the image is in focus the camera will beep and you can press the SHUTTER RELEASE down. The camera will then take a picture.
Step Four
When the camera is not is use it is always proper to turn the camera off. All you have to do is rotate the POWER SWITCH back to the off position
Memory Card Slot
The Nikon D40 digital camera uses SD memory cards to store photos on. To your right is a view of the MEMORY CARD SLOT. To open it slide the cover toward you, the cover should pop open.
Recharging the Battery
Battery Cover
Step 1
View of the BATTERY COVER. To open slide the switch toward the body of the camera and it will pop open. Slide the battery out. To recharge the battery remove it from the camera itself.
Recharging the battery
Step 2
Connect the power cord to the charger and plug it in. Place the battery in the charger and slide it forward until it locks. The CHARGE LAMP will begin to blink. When the battery is fully charged the CHARGE LAMP will go solid. A full charge takes roughly 90 minutes.
Reviewing Pictures
To review a picture click the PLAYBACK BUTTON which is circled in red to the left. To cycle between pictures click right or left using the MULTI SELECTOR which is circled in green to the left
Lens Cap
To protect the camera’s lens, please put the LENS CAP back on the camera when not in use. Just squeeze the clips toward each other and place back over the lens. Make sure it locks properly.
Full Manual
This tutorial went over basic operation of using AUTO MODE of the Nikon D40 Digital Camera. If you are interested in learning more on the advanced features please refer to the owners manual located on the Nikon website.
http://www.nikonusa.com/pdf/manuals/noprint/D40_noprint.pdf


