Difference between revisions of "Buffalo External HD Tutorial"
(→Step 3 Format Drive) |
(→Step 3 Format Drive) |
||
| Line 27: | Line 27: | ||
===Step 3 Format Drive=== | ===Step 3 Format Drive=== | ||
| − | When you are done using the external hard drive, it is best to delete any of your work for the next person to use and the best way to do this, is | + | When you are done using the external hard drive, it is best to delete any of your work for the next person to use, and the best way to do this, is to format the drive. |
| − | First you will go to Computer, | + | First you will go to Computer, click on the drive called "Buff", right-click on the drive and once you have done that, click Format. A Option box will appear, DO NOT change anything, unless told otherwise and click OK. Once you have done that the formatting will begin and everything on the drive will be erased. |
==Full Manual== | ==Full Manual== | ||
This tutorial guided you through the basic usage of the Buffalo External HD Tutorial. If you are interested in learning more, please refer to the owners manual.<br> | This tutorial guided you through the basic usage of the Buffalo External HD Tutorial. If you are interested in learning more, please refer to the owners manual.<br> | ||
http://www.buffalotech.com/files/products/HD-HSQ_DS.pdf | http://www.buffalotech.com/files/products/HD-HSQ_DS.pdf | ||
Revision as of 21:18, 22 July 2011
Contents
Whats in This Kit
| Buffalo 320GB External HDD | 
|

|

|
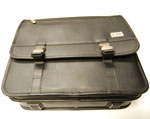
| Buffalo HDD | HDD Bag | Power Supply |
Instructions How To
Step 1 Connect to the Computer
To begin, you will first connect the USB cord to the computer and the AC cord to the outlet, connecting the other ends to the external hard drive. There is also an "On and Off switch", on the back of the hard drive.
Step 2 Access and Save
To access your hard drive and place any of your work into it, you will need to first search for it.
Go to your Start icon on the bottom left corner, click on on Computer and you should see the drive called "Buff". Click it and drag and drop your file onto the hard drive. Simple as that. Or you can save your work from whatever program to the hard drive. Just go to File, click on Save-As, search for the drive called "Buff", click Save and your work will be stored within that drive.
Step 3 Format Drive
When you are done using the external hard drive, it is best to delete any of your work for the next person to use, and the best way to do this, is to format the drive.
First you will go to Computer, click on the drive called "Buff", right-click on the drive and once you have done that, click Format. A Option box will appear, DO NOT change anything, unless told otherwise and click OK. Once you have done that the formatting will begin and everything on the drive will be erased.
Full Manual
This tutorial guided you through the basic usage of the Buffalo External HD Tutorial. If you are interested in learning more, please refer to the owners manual.
http://www.buffalotech.com/files/products/HD-HSQ_DS.pdf