Difference between revisions of "Printing Guide Illustrator/Photoshop CS3"
Chris.wolff (talk | contribs) |
Chris.wolff (talk | contribs) |
||
| Line 456: | Line 456: | ||
|} | |} | ||
| − | |||
| − | |||
| − | |||
| − | |||
<br/> | <br/> | ||
<br/> | <br/> | ||
Revision as of 17:25, 4 December 2008
Contents
Setting up work for output in Illustrator CS3
Step 1
Color Settings

|
If you have not done so already, be sure to first change your color settings in Illustrator to North American Prepress 2. You can access this option by going to the Edit menu and selecting "Color Settings...".
For Settings: select North American Prepress 2. You're settings should match the image on the right. It's important to note that the Working Spaces is set to Adobe RGB(1998)/(Swop) version 2.
Why is Adobe RGB (1998) important for your prints? You use this color setting for print production that will in turn offer the most dynamic range of colors in your printed work.
Click OK.
Step 1.5
Document Color Mode

|
Next, go to the File menu and for Document Color Mode select CMYK. If you see a drastic change on the conversion, then revert.
Step 2
Document Setup in Illustrator
|
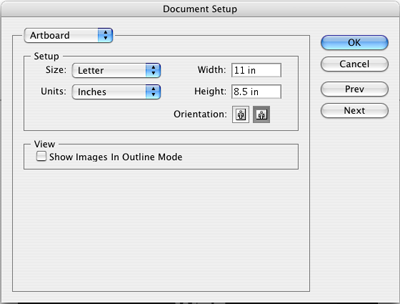
The next step is to (if you have not done so already) go to the File menu and select Document Setup.... You can select and set the size of your document to be relative to the size of the paper you are going to print from. Example: 8.5" x 11" or 13" x 19". Because Illustrator uses vector objects instead of bitmap graphics you can rescale you dimensions of your project without losing any image quality. The exception to this would be placed images that are bitmapped.
Step 3
|
Print Dialog Box in Illustrator
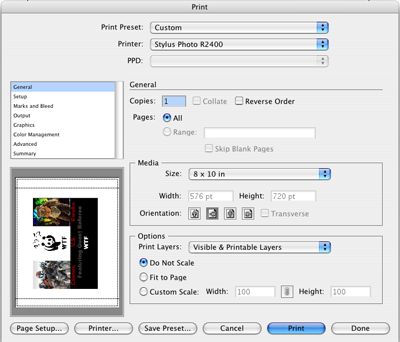
When you are ready to print proceed by going to the File menu and selecting Print....
- For the Printer: option select, Stylus Photo R2400 from the drop down selection list.
- For Orientation, you can make the correction here if needed.
- For Options, make sure Do Not Scale is selected.
Step 4

|
Print Dialog Box in Illustrator - continue
In the left portion of the window, click on Color Management.
- Select the following under Color Management/Print Method,
- Color Handling - Let Illustrator determine the colors
- Printer Profile - SPR2400 PremLuster PhotoRPM.icc
- Rendering Intent - Relative Colorimetric or read the
description for each Rendering Intent and pick a different option.

|
Let's take a second and talk about the Printer Profiles. The list on the left are the only printer profiles that you should be using for the Epson paper we supply you with. For the example above, I selected SPR2400 PremLuster PhotoRPM.icc. When I print on luster I use this setting. Notice there are three profiles for the Premium Luster paper.
The order of quality is:Photo.icc BstPhoto.icc PhotoRPM.icc
Step 5
Page Setup

|
Click on Page Setup... at the bottom left of the Print window (reference image from Step 4). Select, Format for: EPSON Stylus Photo R2400. For paper size you can pick US Letter (8.5" x 11"), or Super B (13 x 19 in). Also note that under this option you can specify borderless if your image is using all of the print surface. Note: Sheet Feeder - Borderless in the image below.
- Click OK when you are done.

|
Step 6
Print Driver Settings
Click on the Printer... button at the bottom left to access the printer driver.

|
- You may need to click the black triangle to expand the dialog window. Note: circled in red.

|
This next step is critical.

|
Working from top to bottom of the window, select the following:
- Printer: EPSON Stylus Photo R2400
- Where it says "Layout" in the popup window, click it, and select Print Settings.
- Media Type: Ultra Premium Photo Paper Luster
- Color Settings: Off (No Color Adjustment)
- Mode: Advanced
- Print Quality: Photo RPM (Remember I picked Photo RPM in Step 4 ?)
- Uncheck High Speed
Click Print at bottom left of the window.

|
The example in this exercise was for using the Epson Premium luster paper. But, you can apply the same work flow for the glossy and matte paper as well. As you can see from the pop-up window there's that reference to,
The order of quality is:Photo.icc BstPhoto.icc PhotoRPM.icc
Step 7

|
Go back to the Print Dialogue Box and select Print from the bottom right corner.
Pat yourself on the back you have printed in illustrator.
Setting up work for output in Photoshop
Please remember the following before you print:
1. Be sure to first change your color settings in Photoshop to Adobe RGB 1998.
2. Your layers are all flattened in Photoshop. Unflattened layers = larger file size = longer time to buffer information into printer.
3. You have the appropriate DPI for output, 180-240-360 resolution. You can check this by going to Image – Image Size in Photoshop.
4. You save a copy of your file to be printed onto the desktop. This is a good thing to do incase there is an error with Photoshop and it closes out. If you have your work ready to be outputted and flattened as a separate file it will save a tremendous amount of time in the future.
Step 1
|
Printing your work
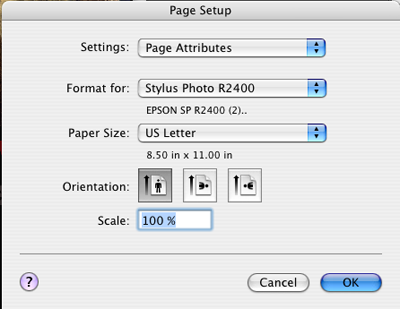
In Photoshop go to File – Page Setup from the top of the toolbar menu. Under the format for: option box select the Stylus Photo R2400 from the list of the printers installed. You will also want to be sure and select the correct paper size from the list on this menu.
Step 2

|
The Print Dialog Box
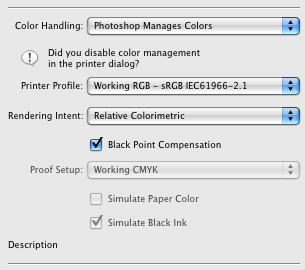
Once you have set the page set correct you can now go in Photoshop to File – Print. This will bring up this wonderful large screen below. You will want to make sure that theTop Left option box is labeled Color Management.
|
Select the drop-down menu entitled Color Handling. You will need to make sure that you select Photoshop Manages Colors We want to select this to keep the color profile that we have been editing in Photoshop to remain native when we output to the printer which has it’s own color profiles.
|
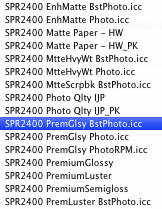
EnhMatte BstPhoto.icc, PremGlsy BstPhoto.icc, PremLuster BstPhoto.icc
Note: If you're on a Printer marked for Matte Black you can only print on Matte paper so make sure to select the appropriate EnhMatte BstPhoto.icc setting.
Step 3
Print Driver Settings
When done Click on the Print button at the bottom left to access the printer driver.
|
- You may need to click the black triangle to expand the dialog window. Note: circled in red.

|
This next step is critical.

|
Working from top to bottom of the window, select the following:
- Printer: EPSON Stylus Photo R2400
- Where it says "Layout" in the popup window, click it, and select Print Settings.
- Media Type: Ultra Premium Photo Paper Luster
- Color Settings: Off (No Color Adjustment)
- Mode: Advanced
- Print Quality: Photo RPM (Remember I picked Photo RPM in Step 4 ?)
- Uncheck High Speed
Click Print at bottom left of the window.

|
The example in this exercise was for using the Epson Premium luster paper. But, you can apply the same work flow for the glossy and matte paper as well. As you can see from the pop-up window there's that reference to,
The order of quality is:Photo.icc BstPhoto.icc PhotoRPM.icc
When done select Print from the bottom right corner. Pat yourself on the back you have printed in illustrator.