|
|
| Line 46: |
Line 46: |
| | :A mixer bar that lets you determine that amount of the affected signal | | :A mixer bar that lets you determine that amount of the affected signal |
| | | | |
| − | ==EQ Presentation==
| |
| − | An Equalizers main goal is it to effect the frequency of an audio signal.
| |
| | | | |
| − | **http://www.canimi.com/webnew/audiospectruma.html
| |
| − | **EQ by the Octave
| |
| − | **Eq Primer
| |
| − |
| |
| − |
| |
| − | [http://en.wikipedia.org/wiki/Equalization Equalization]
| |
| − |
| |
| − | High Pass Filter
| |
| − | : A High pass filter will allow frequencies above a certain point to pass through the fliter.[http://en.wikipedia.org/wiki/High-pass_filter High-pass_filter]
| |
| − | Low Pass Filter
| |
| − | :A Low Pass filter only allow frequencies below a certain frequency to pass through. [http://en.wikipedia.org/wiki/Low-pass_filter Low-pass filter]
| |
| − |
| |
| − | Band Pass Filter
| |
| − | : A band pass filter is a filter the allows a range of frequencies to pass through [http://en.wikipedia.org/wiki/Bandpass_filter Bandpass_filter]
| |
| − |
| |
| − | Simple EQ
| |
| − |
| |
| − | [[Image:EQSimple.png]]
| |
| − |
| |
| − | Simple Graphic EQ
| |
| − |
| |
| − | [[Image:EQGraphic.png]]
| |
| − |
| |
| − | Sound Forge Graphic EQ
| |
| − | : notice there is one slider for each BandPass/BandCut Filter
| |
| − |
| |
| − | [[Image:GraphicEQSoudForge.png]]
| |
| − |
| |
| − | Paragraphic Sound Forge
| |
| − | :The sound forge Paragraphic EQ consists of 4 parametric Equalizers, a low pass Equalizer, and a high pass EQ.
| |
| − |
| |
| − | [[Image:ParaGraphicEQSoudForge.png]]
| |
| − |
| |
| − | Eq Frequency Ranges http://www.recordingeq.com/EQ/req0400/OctaveEQ.htm
| |
| − |
| |
| − | EQ Primer http://www.recordingwebsite.com/articles/eqprimer.php
| |
| − |
| |
| − | <!--
| |
| − |
| |
| − | ==Assign Effects==
| |
| − |
| |
| − | [[MTD2 Group Audio Effects presentations.]]
| |
| − |
| |
| − | Your book and these links may help
| |
| − |
| |
| − | http://www.harmony-central.com/Effects/audio-effects-faq-10.txt
| |
| − |
| |
| − | http://www.harmony-central.com/Effects/effects-explained.html
| |
| − |
| |
| − | You may also try pressing F1 (help) in soundforge and searching for you effect.
| |
| − |
| |
| − | Or reading chpater 3 in the [http://www.amazon.com/gp/product/1401881025/102-3757427-8848148?v=glance&n=283155 Sound Design for Interactive Media]
| |
| − | -->
| |
| | | | |
| | ==Premiere Demo== | | ==Premiere Demo== |
Revision as of 15:27, 14 June 2007
Destructive Effects in SoundForge
A typical effect window
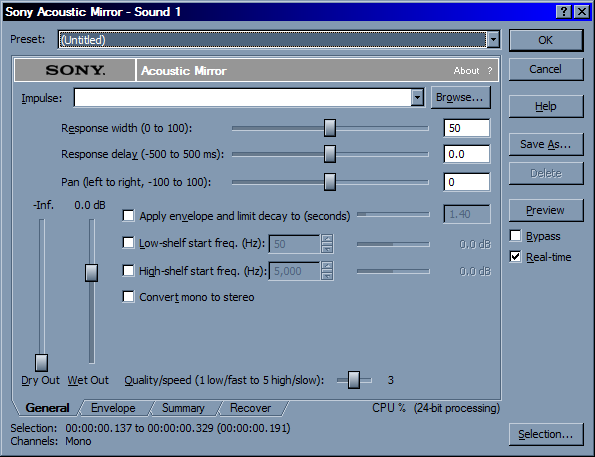
Preset
- Some Presets from sony
Save As
- Lets you save your own presets useful to preserve setting across projects or tracks
Preview
- Play A preview with the effect
ByPass
- Bypasses the current effect useful when comparing affected signal to orgiginal
Dry Out
- A mixer bat that will let you balace the amount of the original signal
Wet Out
- A mixer bar that lets you determine that amount of the affected signal
Premiere Demo
MTD2 Setup Premiere Project
MTD2 Import Cropped Boards
Tools
|

|
| |
| |
| <-- Selection Tool (V) |
| <-- Track Select Tool (M) |
| <-- Ripple Edit Tool (B) |
| <-- Rolling Edit Tool (N) |
| <-- Rate Strecth Tool (X) |
| <-- Razor Tool (C) |
| <-- Slip Tool (Y) |
| <-- Slide Tool (U) |
| <-- Pen Tool (P) |
| <-- Hand Tool (H) |
| <-- Zoom Tool (Z) |
|
Ripple Edit tool
- Changes In and Out of clips
Rolling Edit tool
- Changes In and Out between clips but preserves the total duration
Use the Ripple and rolling edit tool to start laying out the timing of your story.
Premiere audio tools
How to set up Premiere to work with Sound Forge
Premiere Render Demo
Premiere Render Demo
Homework
Arrange boards in Premiere and create rough audio mix.
Start to rough out audio in Premiere. Don't worry about cross fading or transitions between effects. Just rough out some of the sounds and adjust the overall levels of the tracks. Be careful not to clip you should turn down the track volume if you do start to clip.
Render Rough Mix 1 and post it on you website
