Difference between revisions of "Printing Guide Ill/Photo"
| Line 3: | Line 3: | ||
'''Color Settings'''<br><br> | '''Color Settings'''<br><br> | ||
| − | + | {|align="right" | |
[[image:Ill_1.png]] | [[image:Ill_1.png]] | ||
|} | |} | ||
Revision as of 20:04, 11 August 2008
Setting up work for output in Illustrator
Color Settings
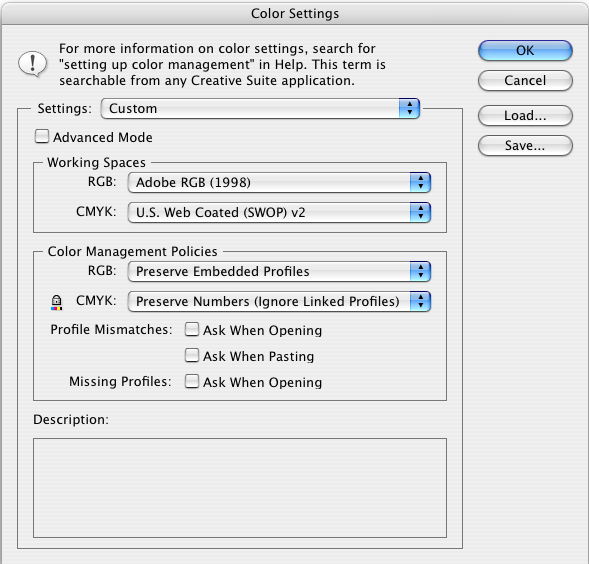
If you have not done so already, be sure to first change your color settings in Illustrator to Adobe RGB 1998. You can access this option by going to Edit – Color Settings to access the menu.
As you can see the description for Adobe RGB (1998) specifies that you can use this profile setting for print production work and offers the most dynamic range of colors.
Be sure to also select all the check boxes for Profile Mismatches and Missing Profiles. This will help cover your bases later on if the profiles imported don’t match up correctly.
Document Setup in Illustrator
The next step is to (if you have not done so already) go into File – Document Setup at the top of the toolbar. Inside this menu you can select and set the size of your document to be relative to the size of the paper you are going to print from. As mentioned before because Illustrator uses vector objects instead of bitmap graphics you can rescale you dimensions of your project without losing any image quality.
Remember you can change the orientation of your document by selecting the correct option.
Print Dialog Box in Illustrator
When you are ready to print proceed by going to File – Print from the top of the tool bar. A new window will open with the following information.
The first thing you will want to do is under the Printer option box is select Stylus Photo R2400 from the drop down selection list.
Next you will want to select the Media table the Size option box and select the paper size you are printing with. This will most likely either be 8x10 or 13x19 inches. You can also correct the Orientation of your work if you have not done so already. Be sure to keep Do Not Scale selected as we have already done so once you have changed the document size select Color Management from the selection menu on the left window.
You can select from the Print Method window under Color Handling the option Let Illustrator determine colors.
You also need to select from the Printer Profile option box the correct paper type that you are using. Remember to select 1440.icc as your ending prefix instead of 2880.icc.
Now select Printer from the bottom left window and it will open up the familiar printer option box for the 2400 series printer.
Once you select Printer you will be taken to the default Print Option Box where you will want to select the correct Paper Type under Print Settings and also select Off (No Color Adjustment) under the Color Management option drop down.
