Difference between revisions of "Geotagging with the Nikon D200"
Gary.kupczak (talk | contribs) (→If the LED is...) |
Gary.kupczak (talk | contribs) m (→Connecting the geotagger:: corrected formatting) |
||
| (52 intermediate revisions by the same user not shown) | |||
| Line 1: | Line 1: | ||
| − | + | [[Image:NikonGP1WithCable.png|thumb|right|Nikon GP-1 GPS Unit with cable.]] | |
| + | [[Image:NikonGP1ConnectedToD200.png|thumb|right|Nikon D200 with GP-1 attached.]] | ||
| − | This tutorial will show you how to attach the | + | The [[Nikon D200|Nikon D200]] kit includes a [http://en.wikipedia.org/wiki/Geotagging geotagging] module that can be attached to the camera. With this module, [http://en.wikipedia.org/wiki/Introduction_to_the_Global_Positioning_System GPS] data can be added to your images to record latitude, longitude, altitude, and time information. |
| − | [ | + | |
| + | This tutorial will show you how to attach the geotagging module to the D200 camera, and how to ensure that it will accurately track where you take your photos. | ||
| + | |||
| + | For information on viewing geotags on a computer, consult the [[Viewing Geotagged Photos]] tutorial. | ||
==Mounting the geotagger:== | ==Mounting the geotagger:== | ||
| Line 8: | Line 12: | ||
===Accessory shoe=== | ===Accessory shoe=== | ||
| − | On top of the camera is | + | [[Image:NikonD200HotShoe.png|frame|Close-up of the Nikon D200's hot shoe.]] |
| − | + | On top of the camera is a hot shoe slot. | |
| + | <br style="clear:both" /> | ||
| + | [[Image:NikonGP1InD200HotShoe.png|frame|Nikon GP-1 attached to Nikon D200 hot shoe.]] | ||
| + | Slide the Geotagging device into the shoe. | ||
| + | <br style="clear:both" /> | ||
===Strap slot=== | ===Strap slot=== | ||
| − | On the camera's strap, there is a plastic slot. Slide the Geotagging device into the plastic slot. | + | [[Image:NikonGP1StrapSlot.png|frame|The Nikon GP-1's strap slot accessory.]] |
| − | + | On the camera's strap, there is a plastic slot. | |
| + | <br style="clear:both" /> | ||
| + | [[Image:NikonGP1AttachedToStrapSlot.png|frame|Nikon GP-1 attached to the strap slot.]] | ||
| + | Slide the Geotagging device into the plastic slot. | ||
| + | <br style="clear:both" /> | ||
==Connecting the geotagger:== | ==Connecting the geotagger:== | ||
| + | [[Image:NikonGP1ConnectingCableToGPS.png|frame|]] | ||
Once the geotagger is mounted, take the squared end of the included adapter cord and plug it in. The arrow should be face up when inserting the adapter into the Geotagger. | Once the geotagger is mounted, take the squared end of the included adapter cord and plug it in. The arrow should be face up when inserting the adapter into the Geotagger. | ||
| − | + | ||
| + | |||
To power the Geotagger, the other end of the adapter cable must be plugged into the camera. | To power the Geotagger, the other end of the adapter cable must be plugged into the camera. | ||
| + | <br style="clear:both" /> | ||
| − | On the front of the camera there is a jack that is covered by a small cap. Unscrew the cap and place it in a safe place. '''Do not lose this piece.''' | + | [[Image:NikonD200AccessoryJackCapON.png|frame]] |
| − | [ | + | On the front of the camera there is a jack that is covered by a small cap. Unscrew the cap and place it in a safe place. '''Do not lose this piece.''' |
| + | <br style="clear:both" /> | ||
| + | [[Image:NikonD200AccessoryJackCapOFF.png|frame]] | ||
| + | <br style="clear:both" /> | ||
| − | + | [[Image:NikonD200AccessoryJackWithCable.png|frame]] | |
| + | Align the arrow on the back of the cable with the white dot next to the jack. Insert the cable and secure it by tightening the silver locking nut. | ||
| + | <br style="clear:both" /> | ||
| − | After you are done, turn on the camera. No more configuration is required. | + | [[Image:NikonGP1ConnectedToD200.png|frame|Nikon D200 with GP-1 attached.]] |
| − | + | After you are done, turn on the camera. The LED on the geotagger will light and a GPS icon will appear on the LCD on top of the D200. No more configuration is required. | |
| + | <br style="clear:both" /> | ||
| − | == | + | ==Reading the signal indicator:== |
| − | + | Before taking a photo, check the GPS signal strength by consulting the LED on top of the geotagger. The stronger the signal, the more accurate the GPS data will be. | |
===If the LED is...=== | ===If the LED is...=== | ||
| + | {| border="1" cellpadding="2" | ||
| + | |- | ||
| + | ||'''LED'''||'''GPS Icon'''||'''Status''' | ||
| + | |- | ||
| + | ||Blinking Red||Blinking||No satellites detected. GPS data will not be recorded. | ||
| + | |- | ||
| + | ||Blinking Green||On||Three satellites detected. GPS data will be recorded but accuracy will be limited. | ||
| + | |- | ||
| + | ||Steady Green||On||Four or more satellites detected. GPS data will be recorded with significantly improved accuracy. | ||
| + | |} | ||
| + | |||
| + | ==Viewing geotags on the D200== | ||
| + | |||
| + | Geotags can be viewed directly on the D200. For information on viewing geotags on a computer, consult the [[Viewing Geotagged Photos]] tutorial. | ||
| + | |||
| + | ==Geotagging tips== | ||
| + | * Poor weather conditions or tall structures such as buildings or trees may prevent the geotagger from establishing satellite contact. The geotagger typically will not function indoors or underground. | ||
| + | |||
| + | * The geotagger may take several minutes to reestablish satellite contact if it has not been used for an extended period of time or has been moved significantly since last contact. | ||
| + | |||
| + | * While the geotagger is on, the D200's [http://en.wikipedia.org/wiki/Exposure_meter exposure meter] will run constantly. This can cause the battery to drain quickly. Turning off the camera when not shooting can help conserve battery life. You may also wish to check out an extra battery. | ||
| + | |||
| + | * The geotagger will continue to receive power even when the camera is turned off. To completely shut off the geotagger it must be unplugged from the camera. | ||
| − | + | ==External links== | |
| − | + | * [http://nikonusa.com/Find-Your-Nikon/Product/GPS/25396/GP-1-GPS-Unit.html Nikon GP-1 at Nikon.com] | |
| − | + | * [http://regex.info/exif.cgi Jeffery's Exif Viewer] | |
| − | |||
| − | |||
| − | + | [[Category:IAM Classes]] | |
| − | + | [[Category:Photography]] | |
| + | [[Category:Equipment Tutorial]] | ||
Latest revision as of 20:04, 5 May 2010
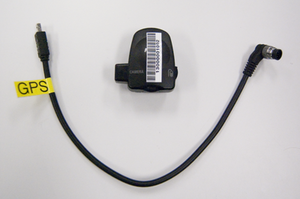
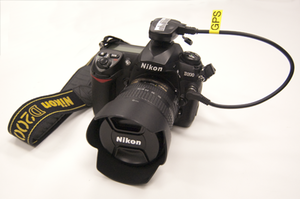
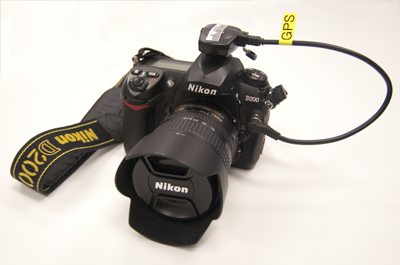
The Nikon D200 kit includes a geotagging module that can be attached to the camera. With this module, GPS data can be added to your images to record latitude, longitude, altitude, and time information.
This tutorial will show you how to attach the geotagging module to the D200 camera, and how to ensure that it will accurately track where you take your photos.
For information on viewing geotags on a computer, consult the Viewing Geotagged Photos tutorial.
Contents
Mounting the geotagger:
The geotagging module can be attached to the camera's hot shoe or shoulder strap.
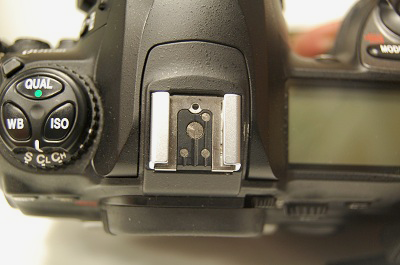
Accessory shoe
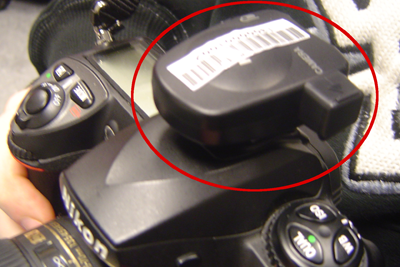
On top of the camera is a hot shoe slot.
Slide the Geotagging device into the shoe.
Strap slot
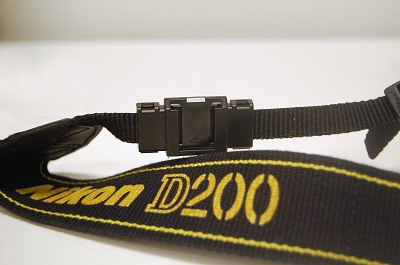
On the camera's strap, there is a plastic slot.
Slide the Geotagging device into the plastic slot.
Connecting the geotagger:
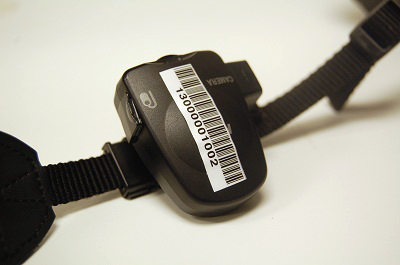
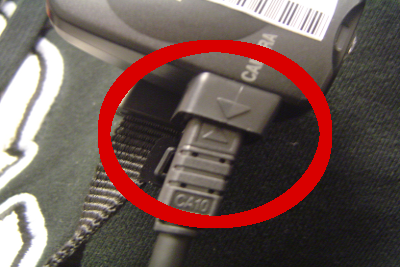
Once the geotagger is mounted, take the squared end of the included adapter cord and plug it in. The arrow should be face up when inserting the adapter into the Geotagger.
To power the Geotagger, the other end of the adapter cable must be plugged into the camera.
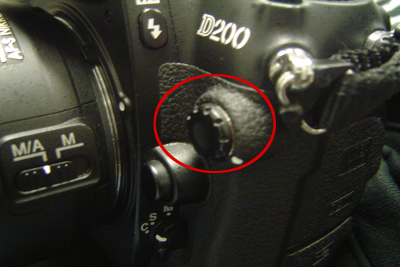
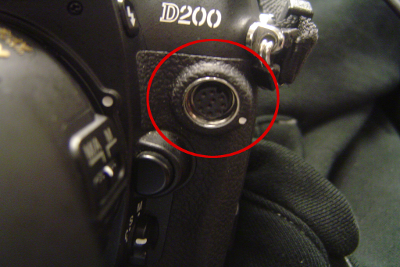
On the front of the camera there is a jack that is covered by a small cap. Unscrew the cap and place it in a safe place. Do not lose this piece.
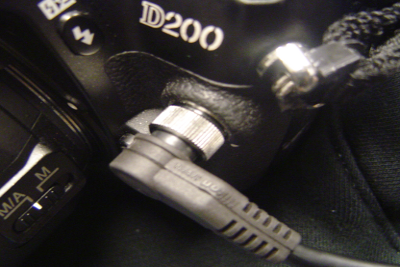
Align the arrow on the back of the cable with the white dot next to the jack. Insert the cable and secure it by tightening the silver locking nut.
After you are done, turn on the camera. The LED on the geotagger will light and a GPS icon will appear on the LCD on top of the D200. No more configuration is required.
Reading the signal indicator:
Before taking a photo, check the GPS signal strength by consulting the LED on top of the geotagger. The stronger the signal, the more accurate the GPS data will be.
If the LED is...
| LED | GPS Icon | Status |
| Blinking Red | Blinking | No satellites detected. GPS data will not be recorded. |
| Blinking Green | On | Three satellites detected. GPS data will be recorded but accuracy will be limited. |
| Steady Green | On | Four or more satellites detected. GPS data will be recorded with significantly improved accuracy. |
Viewing geotags on the D200
Geotags can be viewed directly on the D200. For information on viewing geotags on a computer, consult the Viewing Geotagged Photos tutorial.
Geotagging tips
- Poor weather conditions or tall structures such as buildings or trees may prevent the geotagger from establishing satellite contact. The geotagger typically will not function indoors or underground.
- The geotagger may take several minutes to reestablish satellite contact if it has not been used for an extended period of time or has been moved significantly since last contact.
- While the geotagger is on, the D200's exposure meter will run constantly. This can cause the battery to drain quickly. Turning off the camera when not shooting can help conserve battery life. You may also wish to check out an extra battery.
- The geotagger will continue to receive power even when the camera is turned off. To completely shut off the geotagger it must be unplugged from the camera.
