Difference between revisions of "Dell Laptop Kit"
m (→Laptop) |
m |
||
| Line 23: | Line 23: | ||
_Link_ | _Link_ | ||
| + | |||
| + | ==Auto Mode== | ||
| + | |||
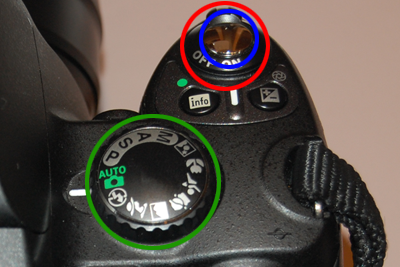
| + | [[Image:D40auto.png|frame|Top view of the power switch and mode dial ]] | ||
| + | |||
| + | Auto Mode is more commonly known as "Point and Shoot", this allows the user to take a picture more easily by letting the camera decide what settings to choose based on environmental conditions. | ||
| + | |||
| + | ===Step One=== | ||
| + | The first step would be to turn the camera on. Looking to the right flip the POWER SWITCH which is circled in red. Once the camera is in and the display monitor turns on you may remove the lens cap. | ||
| + | |||
| + | ===Step Two=== | ||
| + | To the right the mode dial is circled in green. Rotate the MODE DIAL to the AUTO MODE selection. | ||
| + | |||
| + | ===Step Three=== | ||
| + | Once the camera is on you are now able to take a picture. Circled in blue is known as the SHUTTER RELEASE button. While you're looking through the viewfinder, pressing the SHUTTER RELEASE will allow the camera to AUTO FOCUS. Once the image is in focus the camera will beep and you can press the SHUTTER RELEASE down. The camera will then take a picture. | ||
==External Links== | ==External Links== | ||
Revision as of 14:48, 15 August 2011
Contents
Dell Laptop Kit
The Dell laptop kit contains a Dell Latitude D830:
- Windows 7 64Bit
- Intel(R) Core(TM)2 Duo CPU T7800 @ 2.60GHz
- 4.00 GB RAM
What's in the kit?
| Dell Laptop Kit | 
|

|

|

|
| Bag | Laptop | Wireless Mouse | AC Adapter |
Laptop
The Dell Latitude D830 contains the following software:
_Link_
Auto Mode
Auto Mode is more commonly known as "Point and Shoot", this allows the user to take a picture more easily by letting the camera decide what settings to choose based on environmental conditions.
Step One
The first step would be to turn the camera on. Looking to the right flip the POWER SWITCH which is circled in red. Once the camera is in and the display monitor turns on you may remove the lens cap.
Step Two
To the right the mode dial is circled in green. Rotate the MODE DIAL to the AUTO MODE selection.
Step Three
Once the camera is on you are now able to take a picture. Circled in blue is known as the SHUTTER RELEASE button. While you're looking through the viewfinder, pressing the SHUTTER RELEASE will allow the camera to AUTO FOCUS. Once the image is in focus the camera will beep and you can press the SHUTTER RELEASE down. The camera will then take a picture.
